
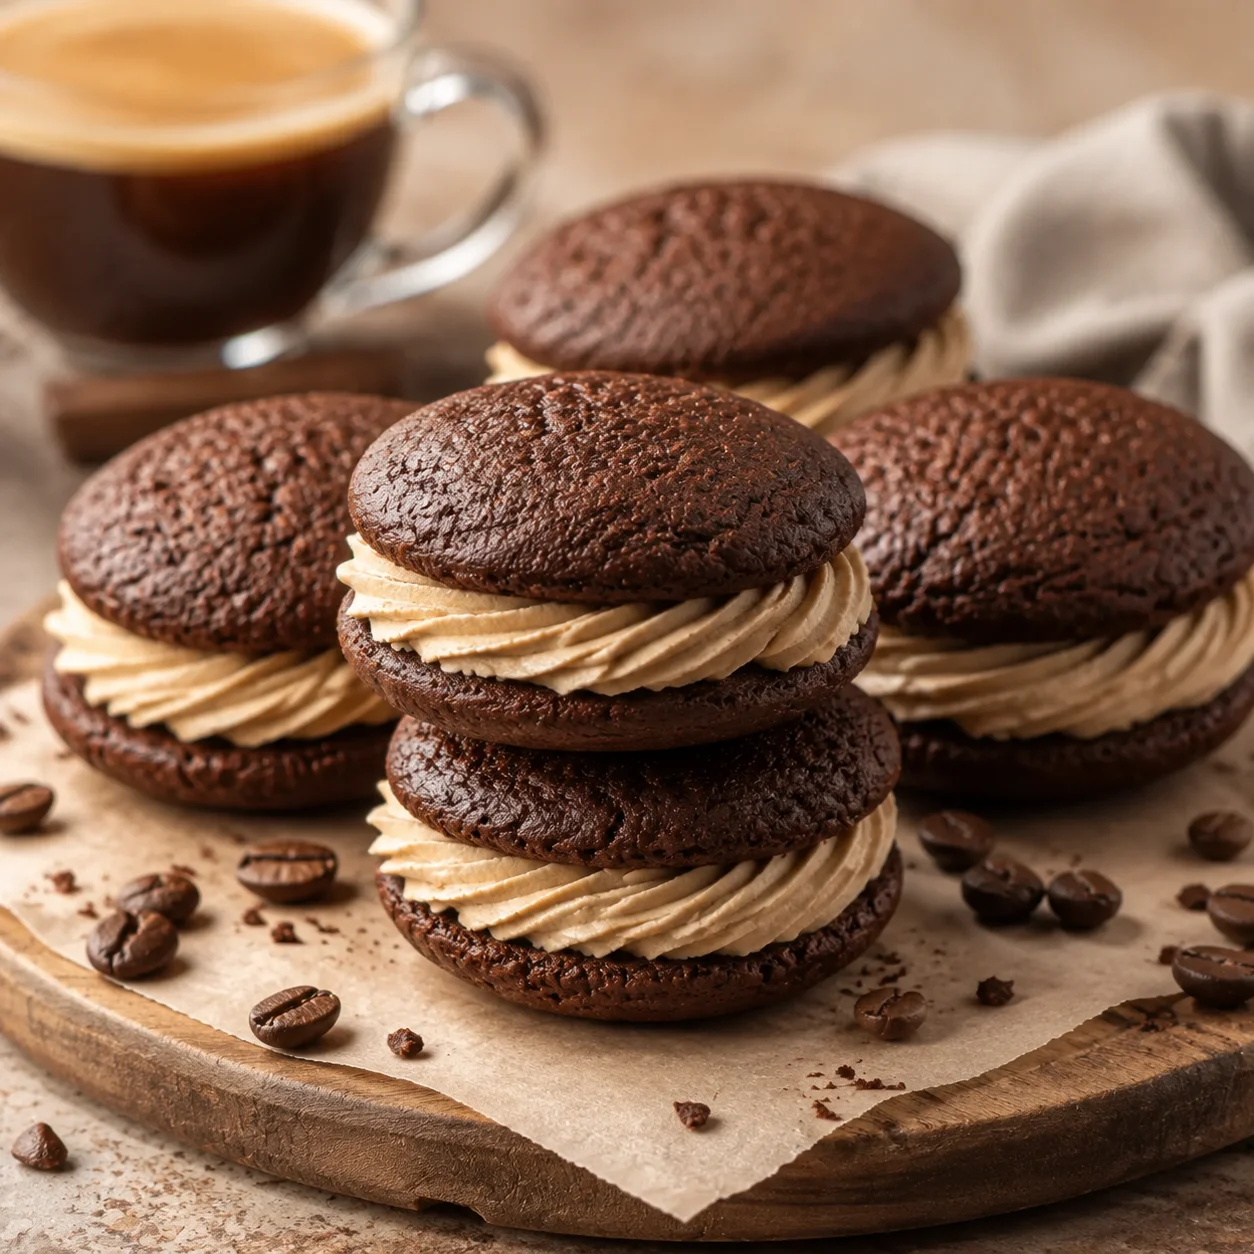
Some desserts feel playful before you even take a bite. Soft chocolate cakes, fluffy coffee cream, and that little sandwich shape make these feel like something from a bakery box, only warmer and fresher.
Rich Chocolate Coffee Whoopie Pies have tender cocoa cakes with a gentle espresso lift and a buttery coffee filling that pipes into creamy swirls. They’re sweet, soft, and just grown up enough without tasting bitter.
The batter comes together with simple pantry baking staples, cooled brewed coffee, and instant espresso powder. Once the little cakes are baked and cooled, the filling whips up quickly and turns them into the prettiest handheld treats.
They’re perfect for birthdays, bake sales, weekend baking, or a coffee dessert table. They also fit right in after a cozy breakfast spread like Easy Overnight Blueberry Pancake Casserole.
This recipe suits chocolate lovers, coffee fans, and anyone who wants a dessert that looks special without fancy pastry skills. A piping bag makes the filling pretty, but a spoon works just fine.
Serve them chilled for neat edges, slightly softened for a creamier bite, or with cold milk and hot coffee on the side. Either way, they disappear fast.
Why You’ll Love This Rich Chocolate Coffee Whoopie Pies:
- Soft cake texture: The chocolate rounds bake up tender, fluffy, and sturdy enough to sandwich.
- Coffee cream filling: Espresso powder gives the buttercream a warm coffee flavor without overpowering the chocolate.
- Party ready: They’re easy to hold, easy to share, and cute enough for a dessert tray.
- Simple baking: No layers, no frosting the outside, and no tricky decorating needed.
- Make ahead: The flavor gets even better after the cakes rest with the filling.
Ingredients You’ll Need:
These ingredients make moist chocolate coffee cakes and a smooth coffee buttercream filling.
Chocolate Coffee Whoopie Pie Cakes:
- All purpose flour: Gives the cakes structure while keeping them soft and tender.
- Unsweetened cocoa powder: Brings deep chocolate flavor. Use natural cocoa powder for the best balance with baking soda.
- Baking soda: Helps the cakes rise and gives them their classic rounded tops.
- Salt: Balances the sweetness and makes the chocolate taste fuller.
- Instant espresso powder: Deepens the cocoa flavor and adds a gentle coffee note.
- Unsalted butter: Softened butter creams with the sugar for a light cake texture.
- Granulated sugar: Sweetens the cakes and helps them bake with soft edges.
- Large egg: Use a room temperature egg so it blends smoothly into the batter.
- Vanilla extract: Adds warmth and rounds out the chocolate and coffee.
- Milk: Keeps the batter soft and gives the cakes a tender crumb.
- Strongly brewed coffee: Use it cooled so it blends into the batter without melting the butter.
Coffee Cream Filling:
- Unsalted butter: Softened butter makes the filling fluffy and smooth.
- Powdered sugar: Sweetens and thickens the buttercream. Sift it if it looks lumpy.
- Instant espresso powder: Dissolve it first so the filling tastes smooth, not gritty.
- Hot milk or water: Helps the espresso powder melt fully before mixing.
- Vanilla extract: Softens the coffee flavor and adds a bakery style finish.
- Milk: Add 1 to 2 tablespoons as needed until the filling is pipeable and creamy.
Step by Step Instructions:
- Prepare the pans: Heat the oven to 350°F and line two baking sheets with parchment paper. Stir the flour, cocoa powder, baking soda, salt, and espresso powder together in a bowl until the color looks even.
- Mix the batter: Beat the softened butter and sugar for 2 to 3 minutes, until creamy and lighter in color. Add the egg and vanilla, then mix in the dry ingredients alternately with the milk and cooled coffee until the batter is smooth and thick.
- Scoop and bake: Drop rounded spoonfuls of batter onto the baking sheets, leaving space between each one. Bake for 10 to 12 minutes, until the tops spring back lightly and the edges look set.
- Cool completely: Let the cakes rest on the pan for 5 minutes, then move them to a wire rack. They need to be fully cool before filling or the buttercream will soften too much.
- Make the filling: Dissolve the espresso powder in the hot milk or water, then let it cool for a few minutes. Beat the butter until creamy, add the powdered sugar gradually, then beat in the espresso mixture, vanilla, and enough milk to make a fluffy filling.
- Assemble the pies: Match the cakes into similar sizes. Pipe or spoon filling onto the flat side of half the cakes, then top with the remaining cakes and press gently until the cream reaches the edges.
Variations and Customization Ideas:
- Mocha boost: Add a handful of mini chocolate chips to the batter for extra chocolate pockets.
- Vanilla cream: Skip the espresso powder in the filling for a sweeter vanilla buttercream center.
- Holiday flavor: Add a pinch of cinnamon to the cakes for a warm coffeehouse feel.
- Mini pies: Scoop smaller rounds and reduce the bake time by 1 to 2 minutes for party bites.
- Less coffee: Use water instead of brewed coffee in the cake batter and keep only the espresso in the filling.
Serving Suggestions:
- Coffee pairing: Serve with hot coffee, iced coffee, or a creamy latte to echo the filling.
- Dessert tray: Arrange them with berries, chocolate dipped fruit, or simple vanilla cookies.
- Party table: Set them out after a cool side like Creamy Greek Yogurt Macaroni Salad for an easy gathering menu.
- Lunchbox treat: Wrap individual pies in parchment and chill them before packing.
- Extra pretty: Dust the tops lightly with cocoa powder or powdered sugar right before serving.
How to Store and Reheat:
Store assembled whoopie pies in an airtight container in the refrigerator for up to 4 days. Place parchment between layers so the tops stay neat and the filling does not smear.
These freeze well for up to 2 months. Wrap each pie tightly, place them in a freezer safe container, and thaw overnight in the refrigerator.
They do not need reheating. For the best texture, let chilled whoopie pies sit at room temperature for 15 to 20 minutes before serving so the cakes soften and the filling turns creamy.
Because the filling contains butter and milk, do not leave them out for more than 2 hours. Keep them chilled until close to serving time, especially in a warm kitchen.
Recipe FAQ’s:
Can I make chocolate coffee whoopie pies ahead of time?
Yes, they’re a great make ahead dessert. Assemble them 1 day ahead, refrigerate them in a covered container, and let them soften slightly before serving.
Why did my whoopie pies spread too much?
The butter may have been too warm, or the batter may have been overmixed after adding the liquids. Chill the batter for 15 minutes before scooping if your kitchen is warm.
Can I use brewed coffee instead of espresso powder?
Brewed coffee works in the cake batter, but espresso powder gives the filling a stronger flavor without adding too much liquid. For the smoothest filling, dissolve the espresso powder before beating it into the buttercream.
Rich Chocolate Coffee Whoopie Pies bring together soft cocoa cakes, creamy coffee filling, and that sweet sandwich shape everyone loves. They’re simple to bake, easy to share, and special enough for a party without needing fussy decorating.
Serve them after a cozy dinner like Creamy Pumpkin Pasta with Italian Sausage (30 Minutes) or tuck them into the fridge for a sweet coffee break later. Add chocolate chips, a dusting of cocoa, or a softer vanilla filling and make them your own.
Print
Rich Chocolate Coffee Whoopie Pies
- Total Time: 37 mins
- Yield: 12 servings
Description
Soft cocoa cakes meet fluffy coffee cream in this bakery style dessert that’s easy to make at home. They’re sweet, tender, and perfect for parties, coffee breaks, or a cozy weekend bake.
Ingredients
Chocolate Coffee Whoopie Pie Cakes
2 cups all purpose flour
½ cup unsweetened cocoa powder
1 teaspoon baking soda
½ teaspoon salt
1 tablespoon instant espresso powder
½ cup unsalted butter, softened
1 cup granulated sugar
1 large egg, room temperature
1 teaspoon vanilla extract
1 cup milk
½ cup strongly brewed coffee, cooled
Coffee Cream Filling
¾ cup unsalted butter, softened
3 cups powdered sugar
1 tablespoon instant espresso powder
1 tablespoon hot milk or hot water
1 teaspoon vanilla extract
1 to 2 tablespoons milk, as needed for consistency
Instructions
- Heat the oven: Set the oven to 350°F and line two baking sheets with parchment paper.
- Mix the dry ingredients: Whisk the flour, cocoa powder, baking soda, salt, and espresso powder until evenly combined.
- Cream the butter: Beat the butter and sugar for 2 to 3 minutes, until light and creamy. Add the egg and vanilla, then mix until smooth.
- Finish the batter: Add the dry ingredients in batches, alternating with the milk and cooled coffee. Mix just until the batter is thick and smooth.
- Bake the cakes: Scoop rounded tablespoons of batter onto the pans, spacing them apart. Bake for 10 to 12 minutes, until the tops spring back lightly, then cool completely.
- Make the filling: Dissolve the espresso powder in the hot milk or hot water. Beat the butter, add the powdered sugar, then mix in the espresso mixture, vanilla, and enough milk to make a fluffy filling.
- Assemble the pies: Match the cakes by size, pipe or spoon filling onto the flat side of half, then top with the remaining cakes and press gently.
Notes
Chill the filled whoopie pies for neater edges, then let them sit at room temperature for 15 minutes before serving. Store in an airtight container in the refrigerator for up to 4 days, or freeze wrapped pies for up to 2 months.
- Prep Time: 25 mins
- Cook Time: 12 mins
- Cuisine: American
Keywords: chocolate coffee whoopie pies